Stripe

If you want to make money, you need to charge users. Thankfully, this is as easy as ever. Providers like Stripe take care of processing payments with any method imaginable. Simply create an account on Stripe, this will have test mode enabled by default, meaning you can pay here without being charged. Also make sure you have the Stripe CLI (see installation) installed, we will need it later.

Get the STRIPE_SECRET_KEY and add it to your .env file

Once again, we don’t have to build our own page. We Simply redirect the user to Stripe, where he can pay and come back to our site.

building our webhook

In the background, stripe will charge the user, and inform us when certain events like a successfull or cancelled payment happens by communicating with our webhook. A webhook is simply said an endpoint where Stripe can send a request to. Open payment_bp.py and take a look at the “/stripe/webhook” route:

payment_bp.py
# --- Webhook ---
@payment_bp.post("/stripe/webhook")
def stripeWebhookRoute():
    payload = request.data
    sig_header = request.headers['STRIPE_SIGNATURE']


    # verify event signature (so that only stripe can send you events)
    try:
        event = stripe.Webhook.construct_event(payload, sig_header, os.getenv("STRIPE_ENDPOINT_SECRET"))
    except ValueError as e:
        raise f"Invalid Payload: {e}"
    except stripe.error.SignatureVerificationError as e:
        raise f"Invalid Signature: {e}"
    

    # user has finished checkout but payment might not have gone through yet
    if event["type"] == "checkout.session.completed":
        current_app.logger.info("User has finished the checkout")

    # when the payment has gone through successfully
    elif event["type"] == "payment_intent.succeeded":
        package_id = event["data"]["object"]["metadata"]["package_id"]
        email = event["data"]["object"]["metadata"]["email"]
        charge_id = event["data"]["object"]["latest_charge"]
        current_app.logger.info(f"Webhook received, that user with email {email} has bought package number {package_id}")

        try:
            set_user_package(email, package_id)
            
        except Exception as e:
            stripe.Refund.create(charge=charge_id)
            current_app.logger.error(f"Error setting user package for email {email}: {str(e)}. Charge {charge_id} refunded.")
            send_plain_email(
                email_adress=email,
                subject="Order Processing Error",
                text=REFUND_TEXT
            )
            
            return jsonify(success=True)
            
        current_app.logger.info(f"Webhook received, that user with email {email} has bought package number {package_id}")
        send_plain_email(
                email_adress=email,
                subject="You are ready to ship!",
                text=SUCCESS_TEXT
            )


    # when a payment failed
    elif event["type"] == "payment_intent.payment_failed":
        email = event["data"]["object"]["metadata"]["email"]
        send_plain_email(
            email_adress=email,
            subject="Your payment didn't go through :(",
            text=CANCEL_TEXT
        )

    # other events
    else:
      current_app.logger.error(f"Unhandled event type {event['type']}")


    return jsonify(success=True)

Here we receive a message from Stripe and first validate it using our STRIPE_ENDPOINT_SECRET, which you will have to set inside .env. This ensures, that only Stripe can send to this endpoint

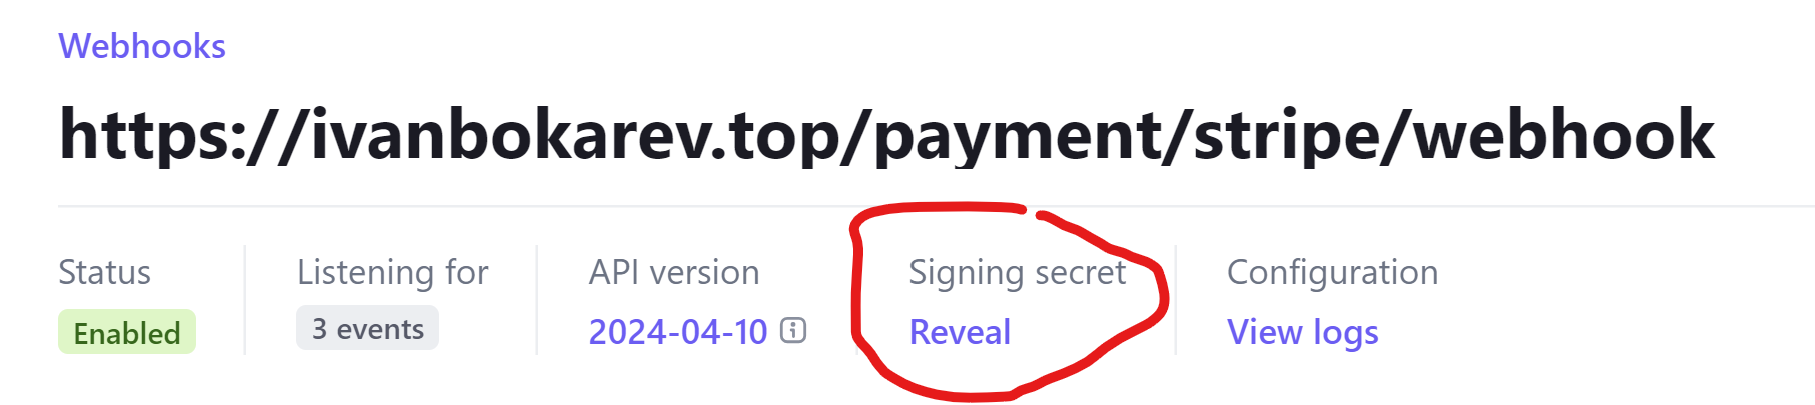
Go to the webhook section, add a new webhook with the events payment_intent.payment_failed, payment_intent.succeeded, and checkout.session.completed. Then copy the webhook key as “STRIPE_ENDPOINT_SECRET” to .env.

After the request is verfied we handle an event by:

  • sending an email
  • calling set_user_package function (or refunding if it fails)

As you can see, we can retrieve information about which user has bought something (email) and which package that user has bought (package_id) from the metadata, since we define those at checkout creation.

creating the checkout

Both of this is set when creating the Checkout Session in “/checkout”.

payment_bp.py
@payment_bp.get("/checkout/<int:package_id>")
@login_required
def checkoutRoute(package_id:int=1):
    # check if already bought something
    _, payed = check_user_status()
    if payed:
        info_log("User has already payed")
        return redirect("/home/payed")
    

    email = session.get("email")
    info_log(f"Creating Checkout for user with email {email} buying package number {package_id}")


    checkout_session = stripe.checkout.Session.create(
        payment_method_types=["card", "paypal"],
        line_items=[{"price": stripe_packages[package_id], "quantity": 1}],
        mode="payment",
        success_url=f"{request.host_url}payment/thanks" + "?session_id={CHECKOUT_SESSION_ID}",
        cancel_url=f"{request.host_url}payment/cancel",
        metadata={
            "email": email,
            "package_id": package_id
        },
        payment_intent_data={
            "metadata": {
                "email": email,
                "package_id": package_id
            }
        }
    )

    return redirect(checkout_session.url)

What is also interesting is the line_items key. Here we will need to provide an id of an item which we create in Stripe under More -> Product Catalog

Once you have created two products (one for each package) and have thereby set information such as price, you can add it to our stripe_packages array and map the items to their “package_ids”. Create two (or how many you need) of those products and add them to the .env file.

payment_bp.py
stripe_packages = {
    1: os.getenv("STRIPE_PACKAGE_ONE, ""),
    2: os.getenv("STRIPE_PACKAGE_ONE, "")
}

If you want to send a user to checkout, simply redirect him to the “/payment/checkout/package_id” depending on which package he wants.

<a href="/payment/checkout/2">buy</a>

Pointing Stripe to our webhook

Lets get back to the webhook part. How does Stripe know where it is located? Once you have deployed your application at it is accessible on the World Wide Web (www), you can set the IP or domain name of it inside the Stripe Settings. While we work locally, however, we will use a technique called pooling. This means we will regularly ping the Stripe servers and see if any updates came through. This is made possible using the Stripe CLI.

stripe listen --forward-to localhost:8080/payment/stripe/webhook

This command will forward the Stripe Requests to our application running locally on port 8080. Note that this is the case when running locally using bash local.sh and not while inside Docker (see structure).

Later once we have deployed to a domain, you can provide the URL to your webhook inside the Stripe interface. When an event occurs, Stripe will automatically send a request there, without you needing to use the Stripe CLI. There you will have the option to receive only the events you need, these are:

  • checkout.session.completed to see when the user filled out the checkout from
  • payment_intent.succeeded to see when the payment has actually gone through
  • payment_intent.failed if the payment failed

As you might remember, we used the send_email functions to notify the user about his payments going through or being cancelled. Read the next chapter on emails to see how we accomplish this